
Complete build of Airfix’s newly tooled Cruiser Vk. VIII Cromwell Mk. IV tank in 1/35 scale. Product Ref A1373.
Part 1 – Starting the Build of the Airfix Cromwell Mk.IV Tank
In this video I discuss the plans for this build. Essentially as it is a brand new 2021 tooling just released by Airfix this will be an Out Of The Box build – with no after-market parts being used.
The plan is to prime using Mr Surfacer, and paint using MRP Paint. However, before going straight on with the SCC 15 Olive Drab I’ll put on some rust colour, which will show when the top colour is chipped off.
The kit is moulded in a crisp plastic, and shows plenty of detail.
So far there has been no fit issues, and the main chassis of the tank hull is going together well. However, with such fine tolerances care must be taken to ensure that sprue gates are sanded down prior to fitting, minimising potential fit issues and seam lines between parts.
Part 2 – Building the Chassis, Rusting with Salt and Using Photo-Etch
In this video I continue with the building of the main chassis, and pleased to report no fit issues have been encountered so far – which is not only good news, but also what was expected from a newly tooled kit from Airfix.
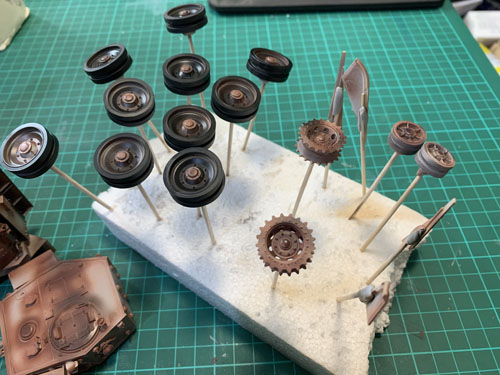
Before fitting the torsion rods that provide the suspension for the wheels I realised I was going to need to paint them, but also the inside of the compartment in which they are housed. It dawned on me this would be a good time to experiment with some weathering, chipping and rusting effects as they areas would not really be visible on the finished model.
I sprayed the internal parts first with a rust colour (I used MRP lacquer paint). I then tried a few different ways of applying small blobs of rubber mask to replicate scratches. I felt I couldn’t get the blobs small enough so decided to raid the kitchen cupboards and get some salt.
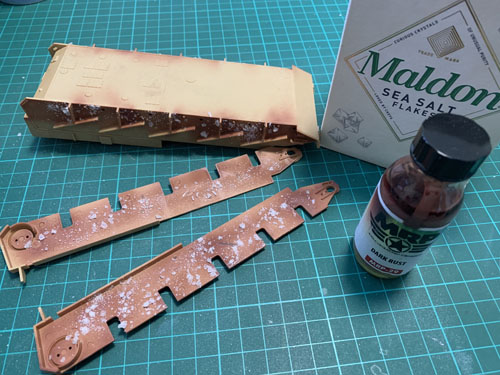
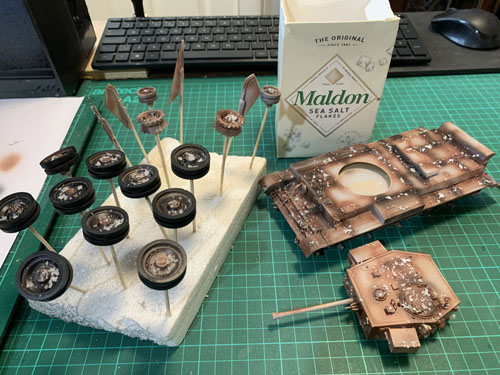
The parts were liberally sprayed with water, then salt was sprinkled on, where the dampness made the salt stick as it absorbed the water. I used a combination of sea salt flakes and regular table salt. This allowed me to experiment with varying sizes and assess the results.
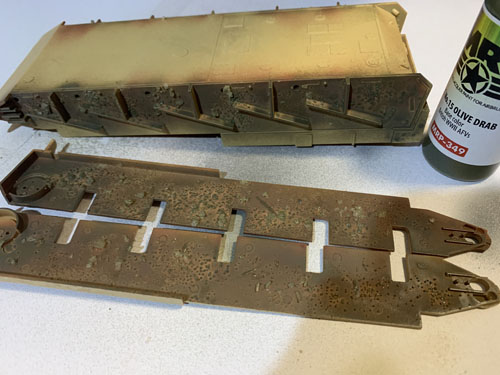
Once fully dried I sprayed the final top colour of the Olive Drab (again using MRP paint). It took a few coats, and I think the salt also absorbed some of the pigment from the paint. Admittedly I didn’t use a primer, and from experience found that the MRP paints are too keen on going onto raw plastic.
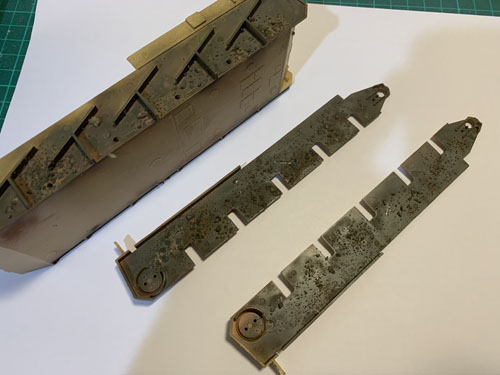
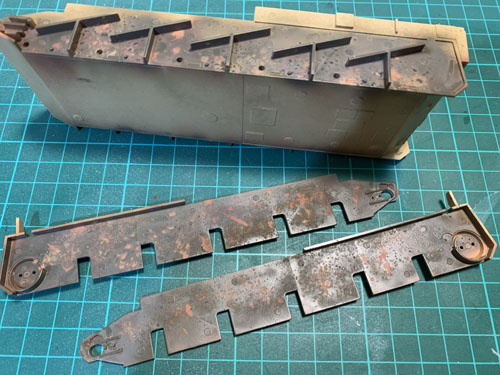
After the colour coat was fully dry I rubbed the parts, using an old toothbrush for the stubborn parts. As predicted the liquid rubber mask blobs were too large and gave a hard edge. The salt worked well, especially in combination. Admittedly I used too much so will use it more sparingly in the future. The finer salt also gave the whole parts a grainy texture and it really looks like the metal is starting to bubble under the paint.
It’s just a shame that none of this will be visible, but it was well worth the additional time to experiment with the techniques that will be used on the model itself, knowing that no harm will come of it.
The continuation of the build went smoothly, though I ensure that all parts were well sanded and sprue gates fully removed and filed down as this can lead to fit issues. Often the tolerance of the kit is so fine any fit issues are likely to be the modeller’s fault for not taking enough care on assembly.
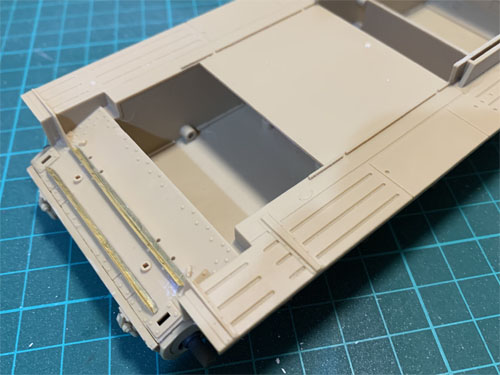
It was nice to have so photo-etch parts in the kit, and these were attached using regular super-glue, with a few squirts of accelerator to hold it in position. The photo-etch represent some angle (L-shaped) iron, but I can no understand why each piece of angle iron was made up of two parts of photo-etch that needed to be glued along the angle. Surely one part with a fold line for each would have been a lot easier!
Part 3 – Building and Highlighting with Metallic Paints
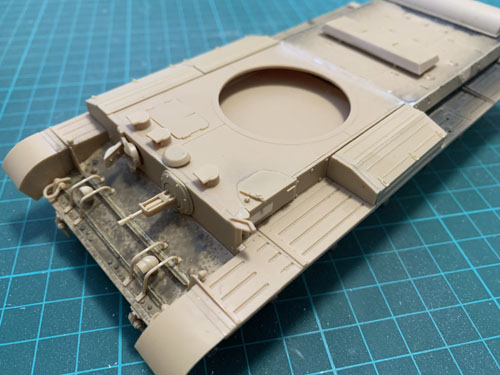
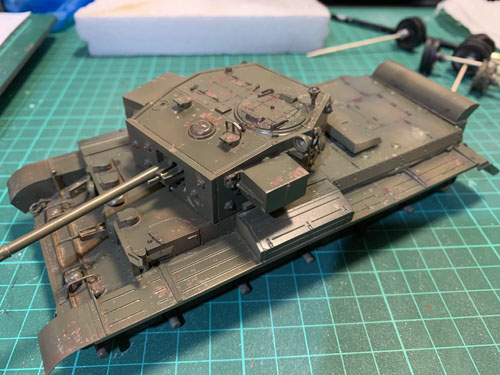
Continuing with building the main chassis I realise that I need to paint and detail some vents before putting on the side covers. Firstly the inside parts are painted in the Olive Drab colour, and the vents are then dry brushed using Mr Metal Silver colour to pick out the raised detail of the vent grill. A brown wash is then applied to darken the recesses, then after a quick wipe they are given another quick dry brush.
The exhausts are painted with Mr Metal Dark Iron. Once dry this can be buffed and gives a good dark metallic finish. This is then covered with a photo-etch grill (that was part of the Airfix Cromwell tank kit).
Part 4 – Finishing Main Chassis & Photo-Etch Issues
In this video I finish the main chassis by putting on the final details (bar those separate parts that will fitted after painting).
Most of this detail is on the front and involves lights, and bars that protect the lights. However, these bars don’t fit over the photo-etch parts! I had to remove part of the photo-etch, fit the bars, and re-fit the photo-etch again. It’s clear that these photo-etch parts were a later addition to the kit as the plastic parts haven’t been designed to accommodate them.
This minor issues don’t detract from the fun of the kit, and it’s progressing nicely.
Next is to build the barrel, turret, wheels, tracks, paint, weather, final details and done! 😉
Part 5 – Building the Turret
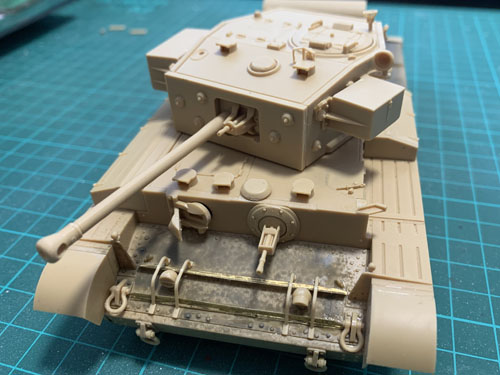
The main tube of the barrel is one piece with only a very faint seam line that needed sanding. Looking at the sprue there appears to be two other variations for main guns, and hence two other versions of Cromwell that could be made.
Although the kit has poly-caps to enable free vertical movement of the barrel there doesn’t seem to be much movement possible.
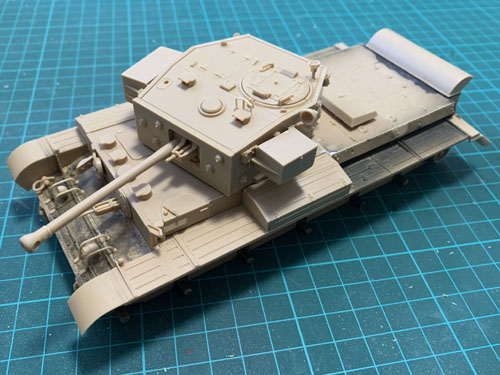
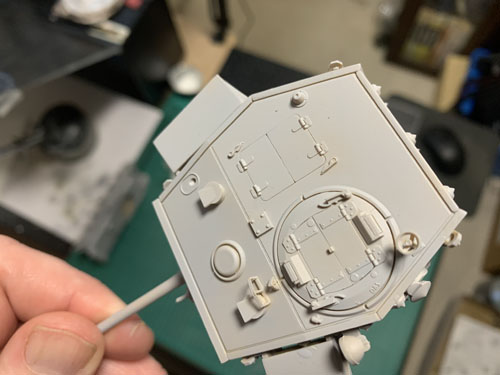
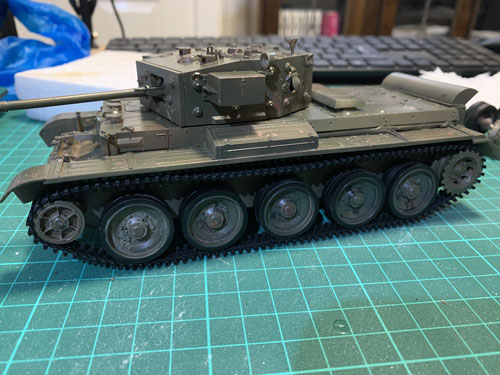
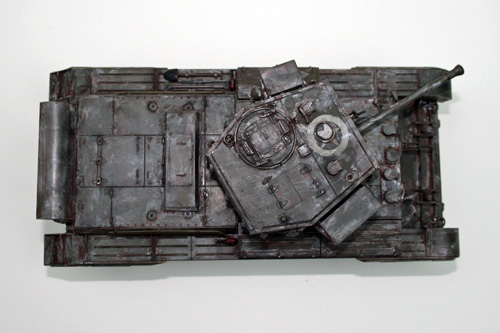
The main turret is a hexagon, and there were some fit issues. Start with the rear plate and work forwards. When the front part (with the barrel fitted) goes on there was a large gap of about a millimetre. This was on the bottom of the turret so will be invisible, and the visible seams fit perfectly.
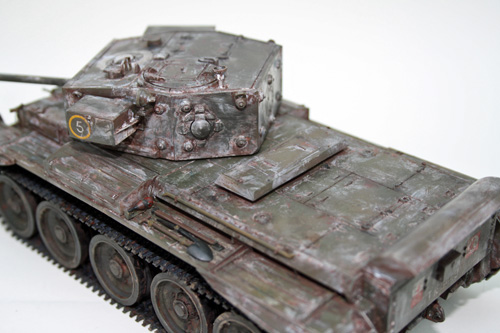
There’s very nice detail to the turret, and the storage boxes give it some additional interest.
I’ve kept the main hatches closed as there is no internal details. I did consider putting a crew (which if placed standing in the hatches would block the view) – though have propped open two small hatches for a little ventilation.
Once the completed turret is placed on the main chassis it really comes together, and once the wheels and tracks go on it will start looking the part.
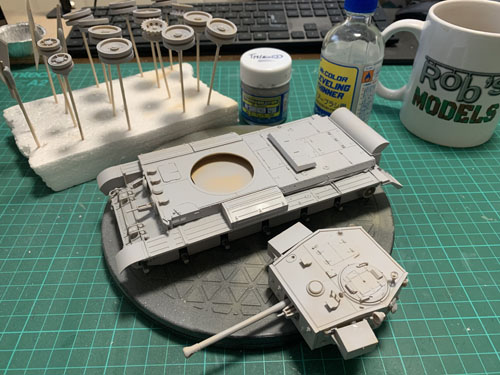
Part 6 – Making the Wheels
The wheels are fundamentally quite simple and the main wheels (five on each side) sandwich together, with a small hubcap on each.
However, I did have an issues with the drive sprocket cogs as they didn’t go together as expected following the instructions. I found the way to assemble them is to attach each of the inner cone parts to each cog, then join together. This leaves a gap between the two cone shaped parts, though this gap matches the gap between the main wheel sets so is correct.
Part 7 – Priming
I primed the Cromwell tank using Mr Hobby’s Mr Surfacer 1200. This was mixed 50/50 with Self-Leveling Thinner and applied with an airbrush.
This gives really good coverage and leaves a nice smooth surface for painting, covering the plastic, filler and photo-etch part – leaving a nice consistent surface for the paint to adhere to.
Part 8 – Pre-Shading with Rust, Painting & Chipping with Salt
This may be a common technique for amour modellers, it may not; but I had the idea of pre-shading (as I would do with aircraft models) but instead of using black to use dark rust.
This would give the shadow effect around the panel lines, but also means that I can using a chipping technique to reveal rusting under the paintwork. The benefit I see to this is the chipping is going to naturally happen on the edges of the panel and hatches – which is exactly where the pre-shading will be the most effective.
Once dry the model was sprayed with water, and salt was sprinkled where the chipping would be. I used sea salt flakes as opposed to the finer regular table salt. Some of the flakes were quite large and found that it could be crumbled which gave flakes of different sizes.
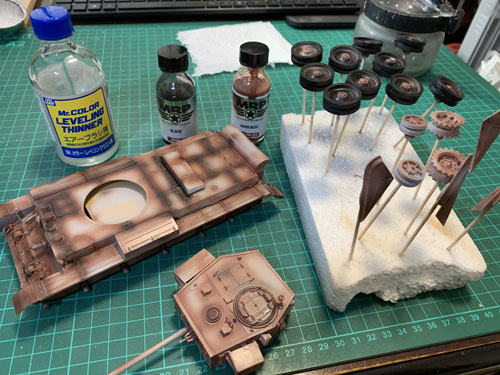
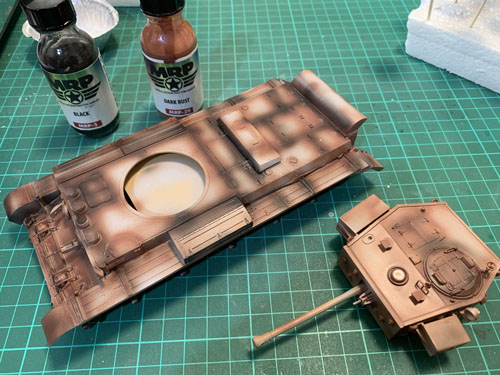
The model was left overnight for the water to dry off not only from the model, but also from the salt flakes. Using a brush I removed flakes where I didn’t want them, mainly from the middle of the panels where rust wasn’t applied.
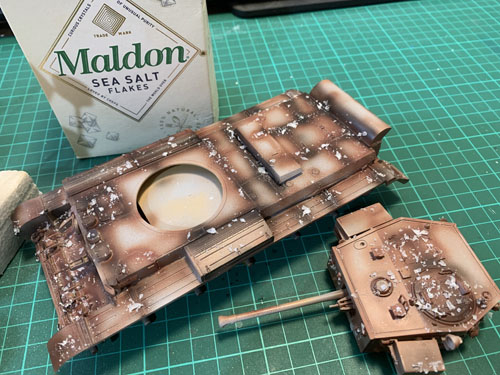
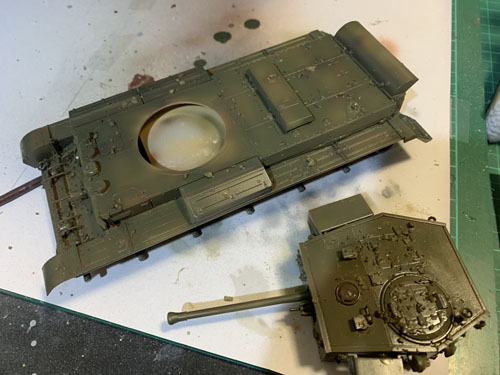
The Cromwell was sprayed with MRP Paint SSC No. 15 Olive Drab. Initially I was going leave it overnight for the paint to dry and cure, but as it is lacquer based and dries quickly so got and used an old toothbrush.


I am pleased with the result, although it is a little stark because the top-coat of paint is fresh. Once weathering is applied it should blend quite nicely, and more rusting and chipping can be applied as the build progresses.
Part 9 – Making Tracks
Part 9 of my build of Airfix’s newly tooled Cruiser Mk. VIII Cromwell Mk. IV tank in 1/35 scale. Product Ref A1373. Today I build the tracks.
The kit actually comes with two versions, the first are rubber/vinyl tracks that simply loop round. They actually have just as much moulded detail to the linkage as the plastic tracks, however they don’t sit properly (though they could be easily glued to wedged into position), and the material they are made from does not take paint very well. However, if you are looking to have a tank that is finished to a “clean” finish (or just don’t want to deal with building up the tracks) then this is a great and simple solutions that takes less than a minute!
So that I could paint and weather the tracks, as well as conform to the wheels and fix in the realistic sag of the track under the weight of gravity I (as most modellers will) wanted to the use the plastic tracks. When removing from the sprue take care to sand down the sprue gates. I initially didn’t thinking that they wouldn’t be visible, but found that some of the sprue gate did push the linkages a little too far apart as some angles.
Keep track which parts are which. Fortunately all the straight pieces are of different size so if they do get muddled up to can count the linkages on the piece and on the instructions. Also ensure you have the linkages the correct orientation.
Though I started using Tamiya Extra Thin glue, it was far more effective to use little dabs of Revell Contacta adhesive to create the initial join which had enough grip to build up lengths of track and enable it to be manipulated around the wheels and sprockets into position.
I started along the base and half way around the drive sprocket at the rear that kept the track in position, then work back to the front and up around the front wheel, dropping to allow for the sag, and finishing around the sprocket. The teeth of the sprocket kept the track in position, but the final link was not glued; meaning that the track could carefully be removed.
Once removed I gave the tracks a brush with Tamiya Extra Thin glue to help strengthen the joins.
They were then primed using Mr Surfacer 1200 (thinned with Self-Leveling Thinner). Then painted with MRP metallic Gun Metal paint. This gives a good solid dark metallic base to the track, and will be further enhanced with dry brushing the weathering.
Part 10 – Decals and Weathering with Panel Liner
Using Iron and Silver to dry-brush the tracks to make them look more metallic and add the impression of weight and wear.
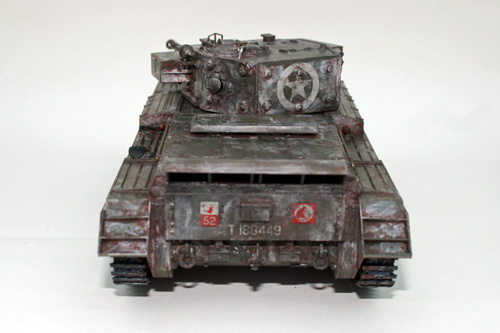
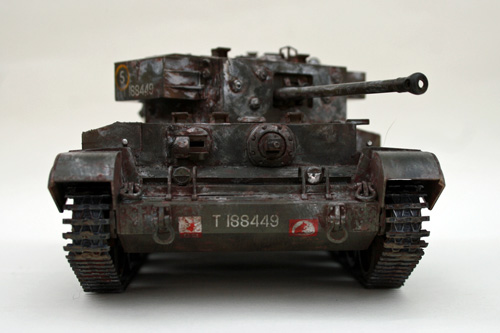
Applying decals
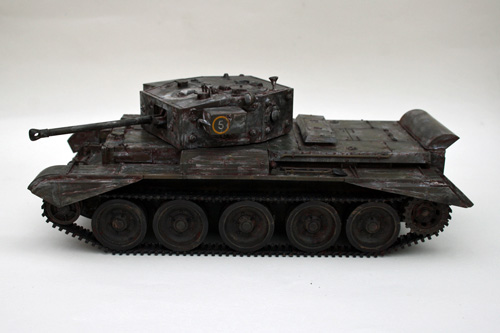
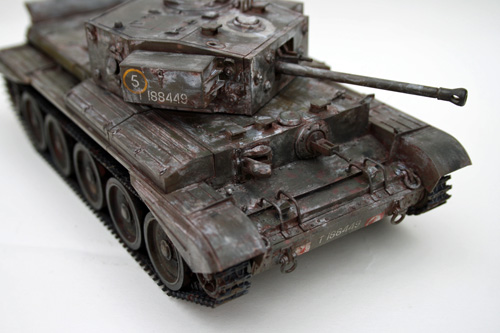
Using Brown Tamiya Panel Line Accent to accentuate the panel lines and give subtle weathering to the Cromwell tank. Coupled with the rusting effect from the salt chipping process this gives a good look of wear and tear from use in theatre, but cleaned prior to the application of winter camouflage.
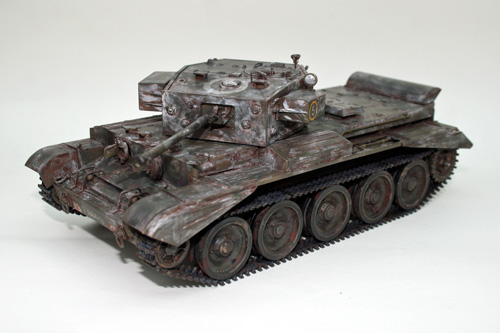
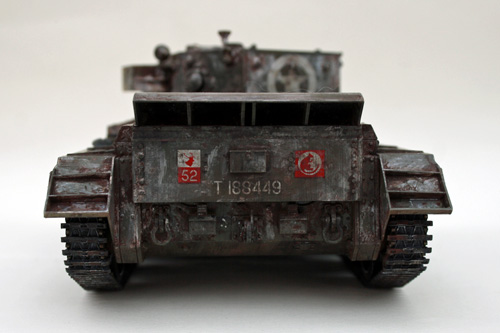
Part 11 – Winter Camouflage, Weathering and FINISHED!
Following on from the Tamiya panel line accent to give a base weathering and highlight recessed details I had applied a very light dry-brushing with a metallic silver on some of the raised areas that would likely be regularly chipped and worn (and therefore not so rusty) such as latches.
This brought the Cromwell to a clean but worn state that I was happy with and wanted to preserve before going further, so I gave it a coat of Pledge floor cleaner. This gives a satin finish which will help further weathering cling to the surface, more than a gloss finish.
The winter camouflage was Insignia White Vallejo Model Air, thinned with a little Vallejo Airbrush Flow improver, and applied with the wide brush. The Model Air range is designed to be used with airbrushes and not brush painted, as it is patchy, shows the brush strokes and wears straight off if the brush goes over again before it’s dried. This is exactly the effect I wanted as the whitewash would have been applied the field by the troops themselves. Likely they’d be cold, wet and tired, and hasty to get the job done!
The instructions call for the winter camo to be applied to the turret sides only, but looking at reference photographs there doesn’t appear to be any consistency, with some Cromwells (and other WW2 tanks in winter camo) barely receiving any paint, and others completely covered in a thick layer, with even wheels and tracks painted.
Research also showed different stages of wear, with some pristine, and others very worn. I wanted to go for a worn look, wear the white-wash (water based) being a temporary paint layer will have worn off – not in the depths of winter. I wore the paint off using cotton buds, paper towel, a damp brush and in some cases just rubbing with my finger. It looked a little too uniform so I re-applied some more to vertical surfaces, and wore more around the horizontal surfaces where the crew would naturally cause more wear.
Once satisfied the whole Cromwell model was given a coat of the water based Flory Models washes, and removed whilst still damp. This puts dirt and grime in the recess, and acts as a filter.
Finally varying colours of oil paint were dabbed around the model and worked in. This adds subtle tonal variation, and darker colours were used around areas such as the exhaust and underside where more dirt, grime and wear would naturally occur.
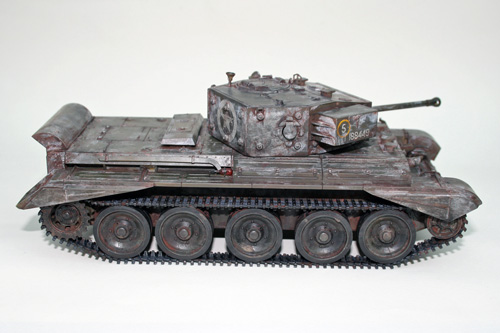
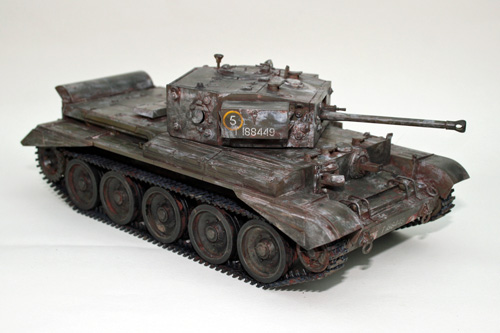
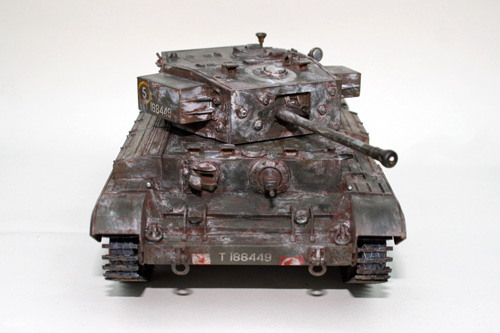

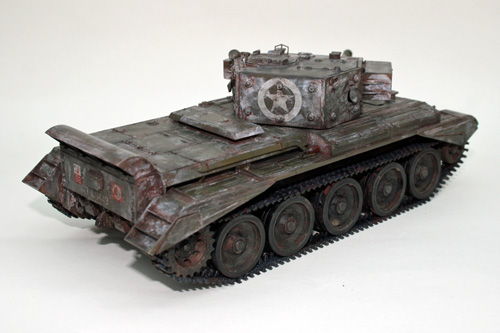

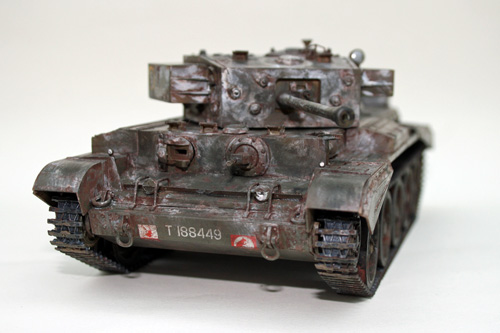
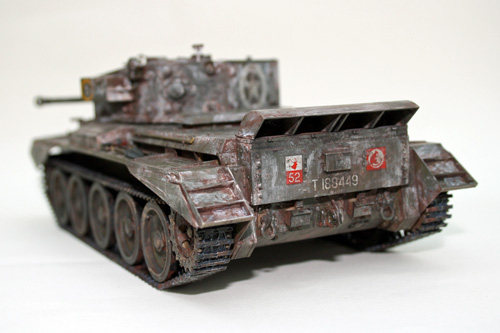
I am very pleased with my finished result. It’s my first 1/35 scale armour build and would like to do more, and I have no doubt that I will look at this model in years to come as my “armour skills” improve and techniques develop to find ways to improve it further.
On that I have got to say that this is a really good kit from Airfix. The kit went together with no issues, and the detail is fine and crisply moulded. As I’m not an “armour guy” I can’t comment on the historical accuracy, but the finished model looks the part and looks “weighty”.
The inclusion of the photo-etch was a pleasant surprise but it is clear this was an afterthought by Airfix and so a little minor fettling was required – but this was so minor it barely needs mentioning. The two options for the tracks was also a nice surprise. The vinyl tracks are very well moulded, but don’t really seem necessary as the plastic tracks went on easily (once I’d worked the best method).
The decals were few, but went down really well – especially when you consider just how big the lumps and bumps were that they had to conform over. Very impressive! They also bedded down, flattened nicely and really do look painted on.
Make sure you subscribe to follow my future builds, and I look forward to reading your comments.