Complete build of Airfix’s newly tooled (2021) de Havilland Chipmunk T.10 in 1/48 scale. Product Ref A04105.
Kit Summary and Customisation Plan

First some backstory. The reason I wanted to build a model Chipmunk is because I flew in one when I was in the Air Cadets when I was a teenager. In fact, it’s fair to say that the Chipmunk re-kindled modelling as a hobby for me. Let me give a little background as to why…
Back when I was a teenager I was in the Air Training Corps, and like many I also built models (mainly Airfix kits knocked up over a couple of Sunday afternoons at the kitchen table and slapping on the tins on Humbrol Enamel with a paint brush). At the base where my ATC squadron met there was a display cabinet, and in that display cabinet was a 1/72 scale Airfix Chipmunk; I remember that it was built to a quality that I could only dream of achieving, and that details had been added such as positioning the flight control surfaces.
Fast forward to 2016 and though I never followed up with a carer in the RAF, I still had a fondness for aircraft; so decided to book some tickets to go to the Royal International Air Tattoo (RIAT) at Fairford. Myself and my wife had a great day watching the flying displays, as well as walking around the static aircraft. Although it was great to stand within touching distance of Tornados, F-16s and Eurofighters; one of the aircraft that caught my eye was a simple Chipmunk. Seeing it I was reminded of flying in one whilst in the Air Cadets, and for some reason that little 1/72 model. A plan formed that I would have a go at building one. Anyway, I snapped some photos and later purchased an old kit on eBay. In fact, a while ago I even found the model in my loft and did a review of the build in order to test out some new camera equipment. You can read the article and watch the video: Airfix 1/72 Chipmunk Build Video.
It’s slightly ironic that I filmed that I filmed it in October 2020 and finished by saying that I would like to build another to see how my skills had developed over the years – and soon after Airfix announced that there were going to be bringing out a brand new tooling of the de Havilland Chipmunk – but in 1/48 scale. Naturally I put a pre-order in and waited patiently for it to be released in summer 2021.
I won’t review the kit on this build page, but you can watch a live unboxing and initial review video. (At a later date I plan to edit the video and add in close-up detail pictures, and then do a proper review article; but for now you can watch the raw live stream footage…)
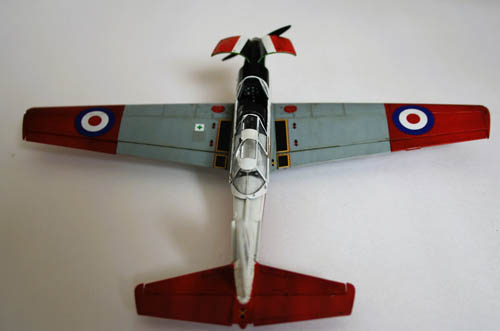
One thing that crossed my mind was to build the Chipmunk, but not following the schemes included in the box; but based on the actual aircraft I flew in whilst in the Air Cadets. I found my Log Book, and in there the two flights were recorded; as well as the serial number (WP840) of the aircraft (I flew in the same one twice). Knowing the code it didn’t take long for me to find actual pictures that Chipmunk on the internet. The pictures do seem to be over a spread of years, but the livery seems to be consistent.


Commencing the Build – the Cockpit
As with most aircraft model builds the instructions start with building the cockpit. This is quite a spartan “office” – especially when compared to military aircraft, with two uncluttered instrument panels. This simplicity and dual control is one of the of the reasons that made the Chipmunk such a respected trainer, and why it continued in use for many years with the Air Cadets. I did consider using some aftermarket 3D decals, but decided to keep things “out of the box”.
One area that is missing (which is common with many kit manufacturers) is the harnesses – or lack of them. The two figures have harnesses moulded onto them, but there is no harnesses provided to go the seats for an un-manned aircraft. Again I did consider going down the aftermarket route, but I’ve had success in the past scratch-building harnesses with flattened lead wire that I decided to go down that route.
I’m sure anyone who ever flew in a Chipmunk will remember that before getting in the aircraft you strap on a parachute – so tightly that you can not stand straight and have to walk to the aircraft hunched over. Then once in the aircraft the harness secure you to the seat. I also found the video that all Air Cadets had to watch before their flight – and I’m sure it will bring back plenty of memories.
Anyway, I used attempted to use the video to reference where the harnesses were located. Unfortunately I realised afterwards that I had made a small error (they should come from a central mounting behind the head), and I painted them brown to give a little contrast to the rest of the dark interior of the cockpit. I do feel that they were needed to help lift the cockpit, but would probably go down the aftermarket route if I built the kit again.


Main Fuselage and Wing Assembly
I had issues bring the two halves of the fuselage together. The cockpit “clicked” into the halves, but I could only get it to one side at a time. I tried both sides, and also filed and sanded areas; but could never get both sides to click into place. This meant that the bottom of the fuselage wouldn’t cleanly marry up, and that there was going to be a gap. I resigned to the fact that I was going to have to accept this and that filler would be required. It’s a shame because up to this point everything was fitting well, and if the cockpit was omitted the seam would barely be visible.
Buy an Airfix 1/48 Chipmunk on Amazon.
Fortunately there was only a single panel that covered the seam, and this could be easily rescribed in afterwards – though it may have been better to make the panel by putting a square of thin plastic sheet over the join.


By far the biggest error of the kits is the locating pins for the wings are in the wrong position. This means that if the locating pins are married up with the holes it forces the wing to bend down – going from a straight dihedral to curving. In the photograph I have removed the location pins from the portside wing and glued it into position (you’ll see the wing is straight), but on the starboard side I have left the pins in place and keeping them located in the holes using the pressure of my hand (you can clearly see the wing is “drooping”). It’s a very simple fix, but I am shock that Airfix allows such a massive cock-up to slip past their quality control as it will affect the look of the finished model.

In homage to the Chipmunk model I remembered from the display case I also did a little bending of the locating tabs so that some of the control surfaces were poised away from their neutral positions, which I always think brings a little more interest to the model and makes it look more natural. One area of interest that is part of the kit design is to have the engine cowlings open to reveal the engine. Although a neat idea, the inside of the cowlings had large and deep ejector pins – and these would be highly visible because they are displayed in the open position. Filler and sanding was employed to remove these large holes. Again, a surprising oversight by Airfix, and something that could have easily been avoided in the design process.


Priming and Painting
The next job was to mask the canopy. Although aftermarket masks were available, the panels are large and mainly square; it wasn’t too much of a fiddly masking with various sizes of Tamiya tape – and as ever a sharp scalpel blade, steady hand and plenty of patience are really all that is required. Whilst on the subject of the canopy, the main sliding part is constructed from three clear parts; and these are held in position with a jig which is part of the kit. I used Deluxe Materials Glue and Glaze (a PVA based glue), but I do think that careful application of Tamiya Extra-Thin would give a stronger bond – though at risk of foggy the windows.
Once masked the canopy was first sprayed with the same black as the interior, as well as some black over the instrument panel cowlings which needed the join sanded. This was masked and the model was primed with white primer. Once the primer was dry white paint was painted on the areas where the white paint goes.
At this point it should be noted that though the kit has four paint options, none of those matched the paint pattern of the Chipmunk I flew in. (Somewhat ironically the it is scheme that was used for the old 1/72 Airfix offering!) Fortunately I could not only refer to images I found of WP840, but also realised the photographs of the Chipmunk on display at RIAT 2016 had the same scheme, so I had plenty of pictures to ensure could mask correctly for the grey and red.
Although glossy added one drop of black paint to the red. This was to help break up the solid block of red which made it look too ‘toy like’ to my eye, however in hindsight I will concede that even one drop of black was too much – though it does give a more natural deeper look to the red areas.
As ever there always seems to be bleed-through from the masking, though for some reason this was mainly on the starboard side. It wasn’t too much hassle to mask and touch up. Once the paint had cure the model was given two coats of Pledge. The Chipmunks were always kept clean and glossy, but I felt that the semi-gloss sheen provided by the Pledge gives a realistic look without being too shiny, but shiny enough for the decals.


Paints Used
Being an Airfix kit the recommended paint codes are for Humbrol Colours, but I primarily used Vallejo colours for this build, and the following is the paints I used.
| Humbrol Code | Area | Vallejo (Used) |
|---|---|---|
| Primer Coat | Exterior | AK Interactive Primer – White |
| Primer Coat | Interior | Tamiya XF-25 |
| 130 (Satin White) | Exterior | Vallejo Model Air: AV71.??? |
| 33 (Matt Black) | Exterior | Vallejo Model Air: AV71.??? |
| 166 (Light Aircraft Grey BS381C:627) | Exterior | Vallejo Model Air: AV71.120 (Dark Grey) |
| 174 (Signal Red BS381C:537) | Exterior | Vallejo Model Air: AV71.??? |
| 85 (Satin Coal Black) | Cockpit | Vallejo Model Air: AV71.057 (Black) |
| 78 Matt Cockpit Green | Engine Bay Interior | Vallejo Model Air: AV71.??? |
Customising the Decals
Decaling the model required a little thought, cross-referencing the scheme options in the kits and comparing it to the reference photographs. The reference photographs proved invaluable because each scheme option was similar (especially the two white/grey/red ones), but there were differences. These differences included border around the walkway, and the colours of the ‘No Step’ icons, plus various others. In the end to make a faithful replica of WP840 I used decals from all of the four schemes in the box.
The biggest issues was to make the serial number (WP840), which also included the number 9 on the engine cowling and tail-plane. Initially I assume that I was going to have to purchase aftermarket decals, and a sheet has been produced for the Chipmunk to allow modellers to create their own serial numbers. But, with a little thought I realised that using a bit of creativity I was going to be able to create the WP840 by taking digits from different serial numbers. However there wasn’t 9; until I it hit me that this obstacle could be overcome by turning a number 6 upside down!
I realise the luck involved, and if I had flown in one of the other Chipmunks that day (if I recall there were four or five giving flights to Air Cadets that day) then it’s likely that I would have needed to purchase the aftermarket decals!


Finishing the Model
With the a few applications of MicroSol the kit decals all laid down beautifully, conforming around the raised details and giving the ‘painted on look’ we all strive to achieve. Despite this the whites in the roundels were solid, with no red showing through. Once left overnight the whole model was given one more coat of Pledge to seal it.
As mentioned the Chipmunk were kept clean, so weathering would be limited. I flew from Bournemouth Airport, which had a concrete runway (not a grass strip) so even dirt would be limited on the underside, let alone mud! I opted for a dark brown panel wash to highlight the engraved detail, a lightly brushed some on the raised details which I promptly removed again with a brush dampened with white spirit; adding a very subtle shadow effect and adding tonal variety to the colours.
The kit went together well (bar the aforementioned issues), and it’s nice to build a model of an aircraft I have a direct connection with – something that modellers rarely have the opportunity to do.