
Follow my build of ICM’s 1/72 scale model MiG-29, released as the “Ghost of Kyiv” set – reference 72140.
Part 1 – Starting the Build (Cockpit and Air Intakes)
In this part we cut the first bit of plastic from the sprue and start sticking bits together!
The focus here is mainly on the cockpit tub and the air intakes. Both of these items only have a small part count, but identifying some issues at the beginning and taking time to rectifying them now will save a lot of hassle later down the line.
I have heard that many modellers have complained about this kit (and it’s various boxings since it was first released in 2008), mainly about fit issues. Things are not “falling together” as would be expected from a modern kits from a large manufacturer such as Tamiya or Airfix – but I can tell that those modellers who have had issues may have rushed forward and not checked alignment (and the future impact) before breaking out the glue.
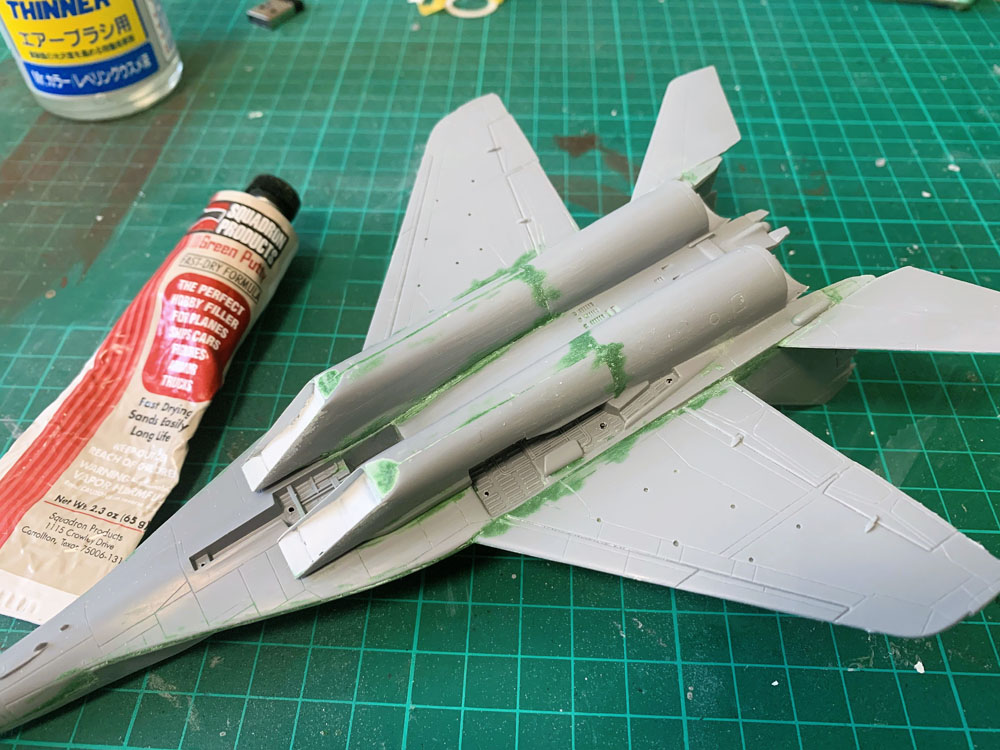
Part 2 – Getting the Fuselage Halves Together and Minimising Gaps
In this part it’s creating the main structure of the MiG-29, and getting it to look neat.
I’ve heard of quite a few people complain about this kit because of the fit quality of the pieces, therefore I was wary of that when approaching the build. I deliberately took my time with the air intakes, and applied the same thought process to the build; meaning plenty of test fitting and building in sections.
It it tempting with a kit to check the parts fit, slap on some glue and maybe put on a few clamps; then expect the kit to need little more than a small wipe of filler and a quick sand. With a more methodical approach I put the two halves together in stages; firstly the rear section (which didn’t have any locating pins!) and left it for an hour or so whilst I had lunch. Once happy that the clamps had held it securely in position and the glue had dried I worked on the front half. This process seems to work well – and gave a better result that if I’d tried to do it all in one go.


Giving the mating surfaces a good sand to get as flat and smooth as possible helped the wings go on, but there were issues with the tail-planes as the locating tabs were much larger than the holes for them to go it. The end result was gaps, but nothing a little filler wouldn’t sort out.
For gluing I selected Revell Contacta for these parts over Tamiya Extra Thin. This glue is more “sticky” and has greater bite, and using the applicator helps control the amount of glue used – limiting how much would need cleaning up afterwards. Once dried some Extra Thin was brushed over the join to strengthen it.
Once the glues had fully cured I used Squadron Green Putty as the main filler – and this was diluted into a paste with Mr Hobby Self-Levelling Thinners. This filler is a little tougher than the water based Perfect Plastic Putty, which I used as a finishing filler to give a final smooth surface. Both fillers can be worked into the gaps, excess wiped away and sanded smooth once dry.


Part 3: Priming, Pre-Shading and Base Coats
Priming was AK Interactive Primer and Microfiller, in White. I’ve been using it for a few builds recently, but as the Ghost of Kyiv will have lots of shades of grey, some of which are very light, it makes sense to go for a white primer.
Of course, with the amount of filling and filing it makes sense to use a good primer, especially as there will a lot of masking to be done in the future – and we really don’t want any paint peeling away. Pre-shading I used MRP Black.

After priming and pre-shading I rubbed the paint down to a smooth finish. For painting I used the ICM Ghost of Kyiv set. These need thinning, and at first I used Vallejo thinner which I mixed in the airbrush cup. I found that the easiest and better method was to top each bottle up with Tamiya X-20A acrylic thinners and give a good shake.
I again rubbed the paint down in preparation for the application of the digital camouflage using the Foxbot mask set.
Part 4: Painting the Digital Camouflage Scheme
If building straight from the box the digital camouflage is provided by decals. As I purchased the accompanying ICM paint set this would mean that two of the colours would be un-used. The prospect of manually masking the scheme by hand would be essentially impossible in 1/72 scale – especially for me. Research led me to FOXBOT’s FM-72-002 digital masks. They were out of stock when I reviewed the kit and planned to start it, but the next day I received an email from Super Hobby saying they were in stock. The purchase was promptly made (along with the resin ejector seat).
I personally think the mask scheme looks more interesting because it has the Ukrainian crest on the back as part of the digital camouflage pattern, which is surprisingly not on the kit decal version.
The paint instructions for the kit only give the codes for ICM paints (and limited codes for Revell and Tamiya colours) for the underside, topside base layer and the medium grey for the nose and rudder fin tips – the dark greys used in the camo are provided by using the decals. The Foxbot mask instructions use slightly different names and FS paint codes (with some Vallejo codes). Confusingly both use the letters A to E for their main paint codes – but these to not tally with each other!
Although the ICM kit instructions don’t list them, I am relieved to say that all the colours in the ICM paint box are used, though it would be good in additional instructions (bar the small diagram on the side of box) cross-referenced the colours directly between the two ICM products.
After various research I’m pretty confident in the follow comparison table – but welcome further input. The paints I used in the build are highlighted in bold.
| Box Art Scheme | FOXBOT Scheme | Part | ICM | ICM Name | Tamiya | Other |
|---|---|---|---|---|---|---|
| AK Interactive Primer & Microfiller (White) | Primer | |||||
| E | Topside (off-white light base), landing gear, wheel bay, intakes & cockpit | 1028 | Off White | |||
| (decals) | D | Topside digital camo (light grey), underside | 1033 | Sky Grey | ||
| (decals) | B | Topside digital camo (medium grey) | 1037 | Dark Grey | ||
| (decals) | A | Topside digital camo (dark grey) | 1038 | German Grey | ||
| F | Nose, rudder tips, leading edges and misc panels | 1034 | Dark Sea Grey | AS-11 | ||
| D | Tyres, seat | 1002 | Black | XF-85 | ||
| E (& G) | Pitot Tubes | 1025 | Natural Steel | X-32 | ||
| F | Exhaust | 1027 | Gun Metal | X-10 | ||
| H | Starboard Light | 1014 | Clear Green | X-25 | ||
| J | Port Light | 1011 | Clear Red | X-27 | ||
| Varnish | 1002 | Satin Varnish |
Part 5: Decals, Weathering and Summary
In this (final!) episode I put on the decals, weather (using Flory Models Dark Dirt Wash), upgrade the seat with an aftermarket resin replacement; before (finally!) calling the model done, and giving my final thoughts on the kit, and the building and painting process.
Not perfect, and not the finish I was hoping to achieve – but many lessons learnt – one of which is to double check reference photos and not to rely on the paint being anything like the shade it’s meant to be!